Controlling Captivate – Media Queries
March 28, 2015
Controlling Captivate – ShowHide
February 9, 2016If you’re like me, you’ve often found yourself creating a highlight box, a callout, a drop shadow, etc. in your Captivate file and you’ve forgotten the RGB or Hex code of the color you want to use. It’s frustrating to stop what you’re doing, look for that piece of paper, design document, etc. to locate the color code and then return to your work in Captivate. If you’ve ever wished there was a customized color palette available that contains only the colors, shades, fill percentages, etc. that you want to use in your project that is always visible and ready to use when you need it then this blog is for you!
Creating and using a custom color palette in Captivate is nothing new but it is an option that a lot of new developers may not be aware of and that a lot of experienced developers forget about. It is very quick and easy to implement and will increase your productivity so you’re not searching for the color used in a specific graphic, returning to previous slides or files to find that color, fill percentage, stroke width, etc.
Here are 3 different ways to easily do this. The hardest part is picking the option you want to use for your next Captivate project!
Option 1: Create Your Own Palette
In just a few simple steps you can create your very own customized color palette:
1. Define your colors
You’ll need to define the colors you want to include in your palette. Hopefully a lot of these decisions were made during the Design/Prototyping phase of your project. You may be using colors from your interface, a customer’s logo, a specific image, etc. and you should also define colors and styles of other elements you’ll be using in Captivate like highlight boxes, arrows, rollover areas, etc. Once you have a list of the colors you want to utilize, record the RGB (e.g., 255, 255, 255) or Hex color code number (e.g., #FFFFFF) and any other identifiers that may be applicable such as Solid/Gradient, percentage of fill, stroke width, etc. for each element.
2. Create a simple graphic containing your palette
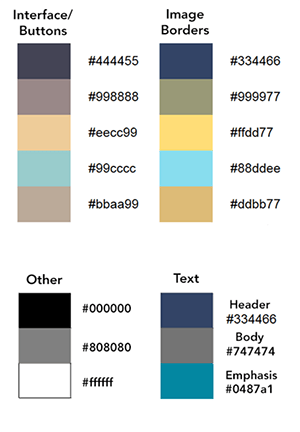
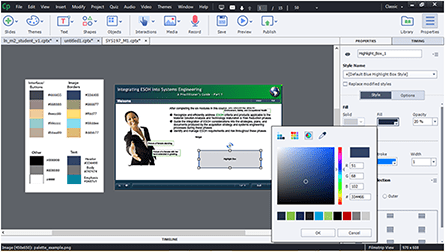
Next you’ll need to create a simple graphic that contains all of the information you just recorded in a visual manner. You can use any image editing software or other software application that will let you export a graphic file. Create shapes that contain the various colors you want to include in your custom palette in your graphic. You can also include additional information if you like such as the name of the color and the applicable RGB or Hex code for each. I like to also categorize my palette with other identifiers such as Interface colors, button colors, text, etc. It’s up to you how much or how little detail you want to include. Shown below is an example of the type of palette I like to work with:
3. Export/Save your graphic file and then import the image in to the Captivate file you’re working on. I then move the image to the left of the stage so I can quickly access it. Since it is not on the stage the image will not be visible to users when your file is published.
4. Set the timing of the image to display for the rest of the project so it’s visible on every screen. See an example below.
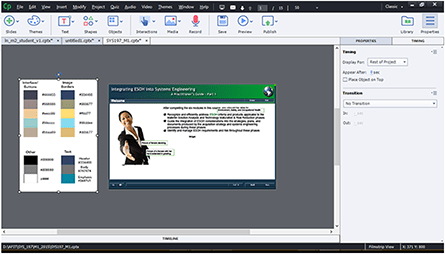
5. When I create an element on the stage and want to change the fill and/or stroke color I use my palette to select the applicable color.
- Select the element.
- Select the Properties tab and click on Fill or Stroke to display the Captivate palette.
- Select the Eyedropper tool and click on the color in your custom palette that you want to use.
- Your selection is applied.
Option 2: Auto-generate a palette
Another option is to generate a custom palette based on the colors in a custom interface, graphic, image of your choice using the website http://www.degraeve.com/color-palette/ or one of the many other sites that perform this task for you. Simply supply the URL of the image you want to generate the palette from and click the Color-Palette-ify! button. The site will create a palette for you. It’s that simple! The example shown below was auto-generated based on our company logo:
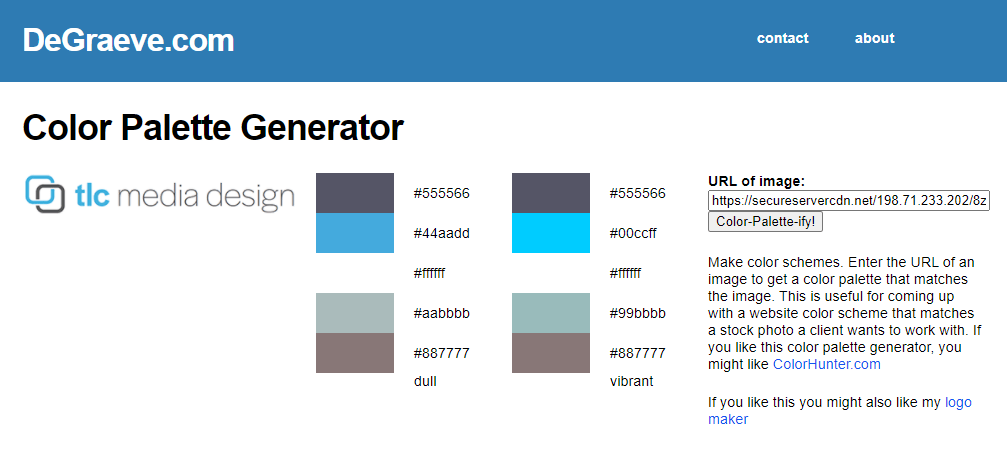
Unfortunately, you can’t easily save the image from this site but there is an easy workaround. You could either screen grab the palette and create an image to use in Captivate or write down all of the Hex codes and create a custom palette graphic to use in Captivate. Then just follow the steps in Option 1 to import and use your custom palette.
Option 3: Use a Captivate Theme
If you happen to be using one of the Captivate themes, a palette is automatically generated for you based on that theme. Also, as you’re working, if you select other colors that aren’t already in the palette, they will automatically be added to your palette when you make a selection. You’re still free to create a custom palette in these situations too; however, you may not need to if you plan to use the colors utilized in the theme’s interface.
Using one of the 3 great options shown here can be a real time-saver for all of your Captivate projects. Just choose the option that is the best fit for you and go for it!
Want more tips and tricks on how to control Captivate? Click the Sign Up button below to obtain access to all of our FREE resources!!!
If you found this blog helpful we’d love it if you’d share it with your friends on Facebook, LinkedIn, and/or Twitter! You can also follow us on your chosen social media platform by clicking the applicable icon below.

