Controlling Captivate – Pause IT!
April 14, 2014
It’s in the Details: eLearning Timesaving Tips
July 18, 2014Have you ever created a Captivate file only to find out later that you’re forced to make the same revisions on every slide, such as changing objects to display for the rest of slide vs. the 3 second default?
Or maybe you’ve had to change your recording settings for each video demo or simulation you need to create?
Frustrating, right?
We have some useful tips for you below to make your course development efforts a bit easier and a lot more efficient. If you’re new to Captivate you’ll find these tips to be huge time-savers. If you’re an experienced user, you’re probably already familiar with the tips found below, but they’ll serve as a good reminder of how to increase your productivity using this tool. Let’s jump right in …
1. Establish Global Preferences
Performing these simple and fairly quick setup steps will make using Captivate much simpler and may also help prevent file corruption issues. Taking the time to set global preferences (which will apply to all projects created after these steps are performed) is a big time saver. Before setting up your global preferences, make sure you do not have any Captivate files or Captivate template files open. If you do have a file open, the preferences you select will only be applied to the open file(s) and will not be globally applied to new files you create.
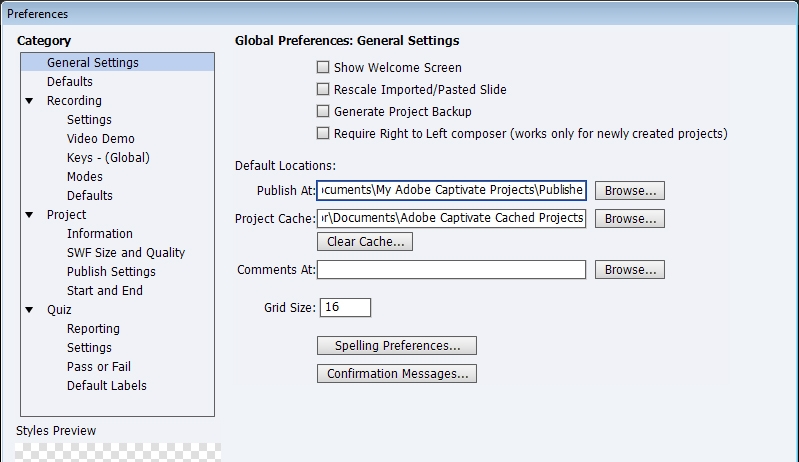
From the Edit Menu, select Preferences. A dialog box will open and you can select the options you want to be globally applied to all files created after your global preferences are saved. Here are a few suggestions you may want to consider in your global preferences settings:

Under General Settings, select the checkbox to the left of “Generate Project Backup.” This option is not selected by default so you need to turn it on to automatically save backup files. By selecting this option, a backup file is created allowing you to retrieve the last saved version if the working file becomes corrupt, is accidentally deleted, etc. Note that the backup file is not generated until you have saved the working file for the second time. Don’t forget to save often!
Under Defaults you can change the slide duration, project background color, and other options that will make project creation more efficient. Most importantly, set up your object defaults for each object type. The default for most objects is to display for 3 seconds. To avoid a lot of editing later, go ahead and set them to display rest of slide if the option is available. You can always make objects display for a shorter period of time on the timeline if needed; however, you’ll typically find that most objects will display until the slide ends for the most part.
Also under the General Settings option, you can set up the directory path where files will be published. If working in a team environment, this can be used to ensure everyone is saving and publishing their files to the designated area and files are available to the team. Remember, if you store files directly on your computer no one else can access them except perhaps a system administrator. This can cause severe issues for your team and delay your project.
In addition, under the Recording settings you have the option to customize many options for your screen recordings such as camera sounds, keyboard tap sounds, the video color mode and more. Doing this as a global preference will alleviate the need to do it each time before recording.
2. Set up Object Style Manager and Project Preferences
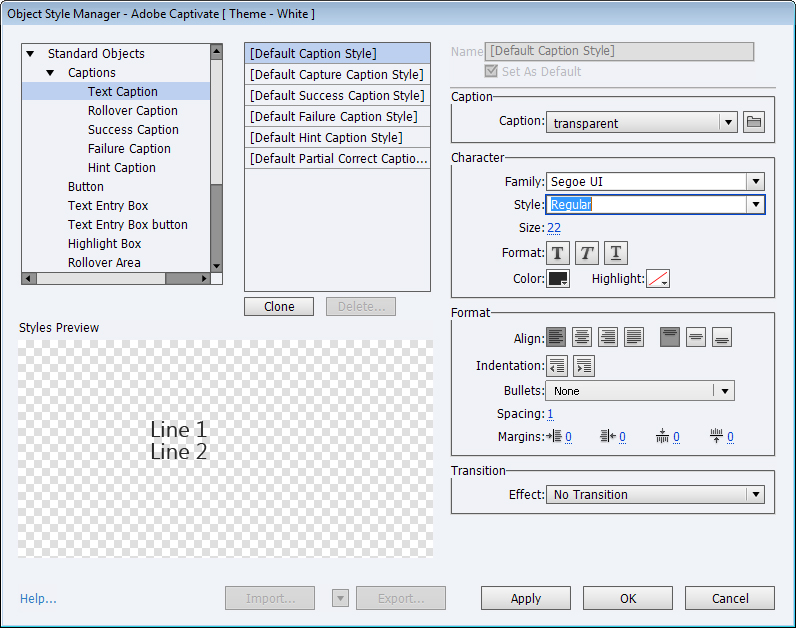
Captivate defaults for captions, buttons, quizzing and other standard objects may not be the desired options you need for your project. At the beginning of your project, take the time to establish what these objects should look like, what fonts you’ll use, how long you’d like the objects to display, etc. using the Object Style Manager.

Define the style, color, font family, point size, and other formatting options for each caption type and don’t forget to select the caption you’ll use most often as the default.
Do the same for each of the available quizzing objects.
3. Test Font Quality
The readability of fonts in a published .swf have been an issue in Captivate since its inception. Unfortunately, it still seems to rear its ugly head to date. Sometimes you’ll notice the font looks fuzzy or seems to fall apart if you enlarge or reduce the size. Others may be very difficult to read. There are many, many blogs and forum posts concerning this issue. It’s a mystery why this still remains an issue after 7 versions of this product and has created a lot of wasted time and frustration for many of us. As a suggestion, before you begin working on a project, create a slide in Captivate which consists of several different captions using various point sizes. For example, create a title caption, a text caption, a smart shape with text, and a failure or success caption using the font and sizes you’d like to use. Save the project, publish, and view the published file to ensure the quality of the font you select is satisfactory. If you’re using an LMS, upload the test file so you can see what your users will see. If the quality isn’t acceptable, keep trying until you find one that works well. Then use that font(s) for your project to avoid a lot of headaches later and unnecessary revisions later on.
4.Copy/Paste Options
Have you ever pasted text from a Word document only to find it displays all messed up in Captivate? This can happen because the formatting in your Word document may not transfer well to Captivate. There is an easy (although somewhat tedious) way to avoid this. Copy the text from Word, paste it in Notepad which strips any formatting, copy the text again in Notepad, and then paste in Captivate. You will have to apply any formatting you need to the text once it is pasted but it should paste in to Captivate without issues.
5. Set up Course Standards
It’s a great idea to establish course or project standards before you get started, especially if working with a team. To ensure a consistent look & feel across slides (and the entire project), take some time to determine x/y coordinates for standard objects such as titles, text captions, etc. and record them in a shared document. Decide upfront what fonts and sizes you’ll use and in what situations they should be applied. Create and follow a course color palette and standardize what colors are used for different objects, for emphasis, and more.
You can make this as detailed as you want or just include the basics. This will help you and other team members avoid things such as noticeable “jumps or shifting” of objects between slides; different fonts, colors, etc. being used by different developers creating inconsistency, and can serve as a guide for testers to follow. This simple document helps make sure your team creates a professional and polished end-product and can serve as a living document during the lifecycle of the project.
I hope this post has given you some insight that will help you boost your productivity while using Captivate! Implementing these simple tips and guidelines will save you valuable time and alleviate a lot of stress allowing you to focus on what really matters … developing an effective course for your users!
Have other tips and tricks you’ve found useful? Share them with us below.


3 Comments
Great Post.
Thanks for the useful article.
Can anyone point me to the appropriate place to find what the 10 theme colors under the Theme menu item are actually mapped to?
If I change them in an existing Theme, I don’t seem to get “global” changes when the “Theme Colors” are saved and the theme is “refreshed” on a project.
Themes are located here: C:\Program Files\Adobe\Adobe Captivate X x64\Gallery\Layouts\X_0\en_US
If you want to make changes to a theme save it as a different name.